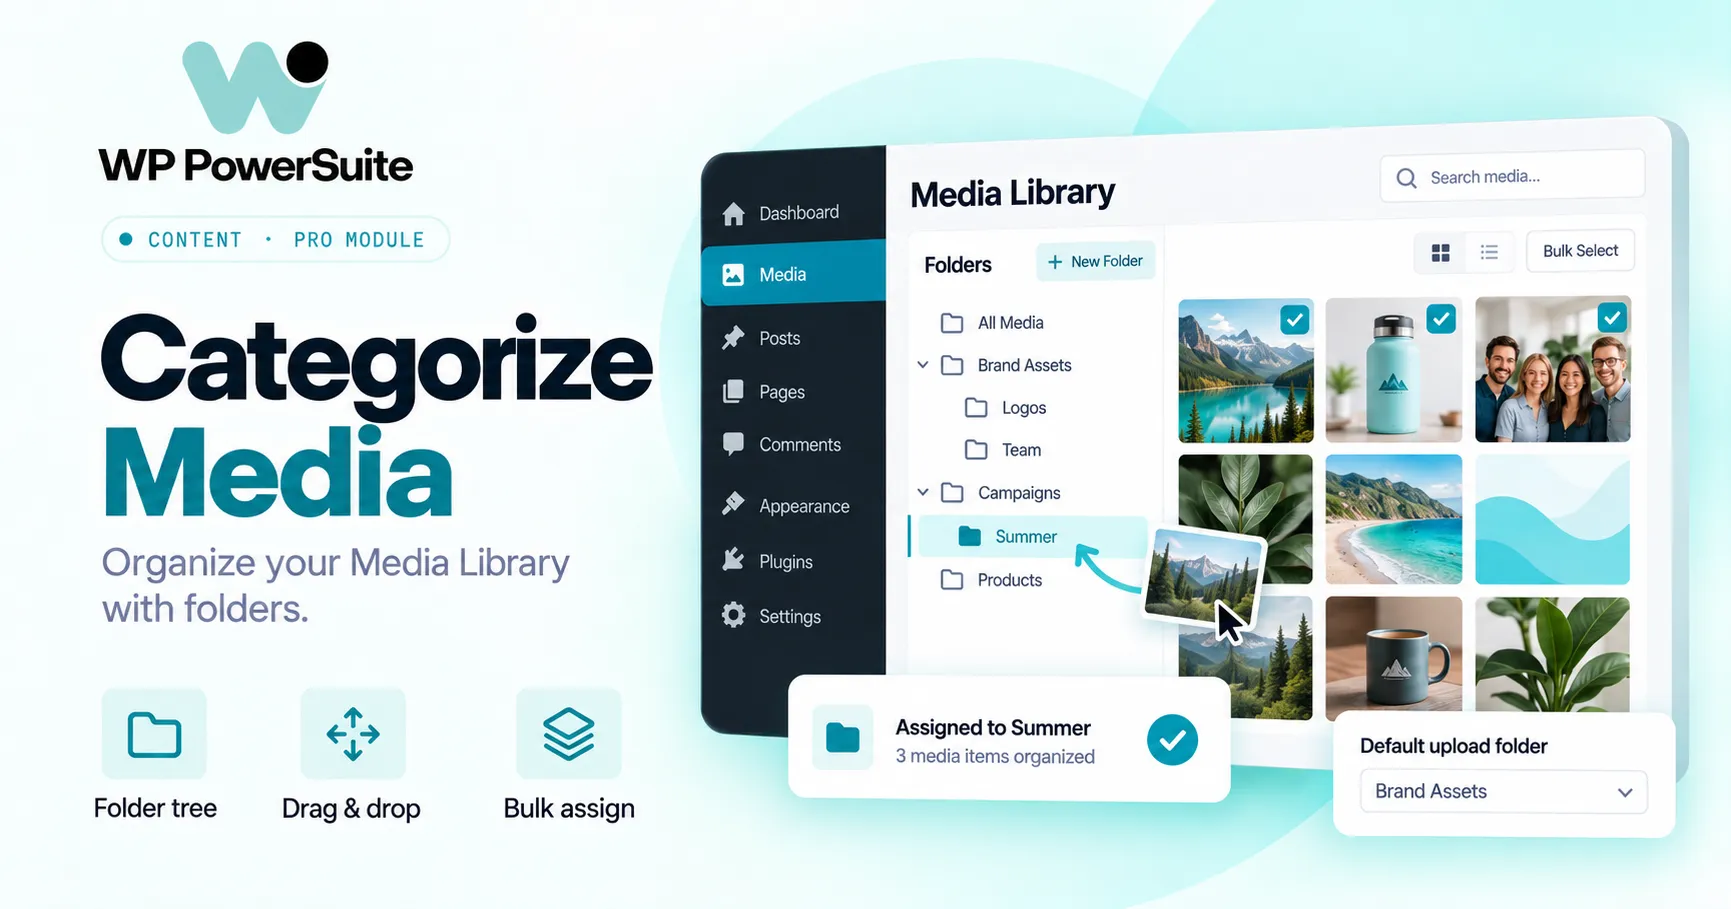
WP PowerSuite’s Categorize Media module adds WordPress media folders to your existing library. Create a clear structure, file several assets at once, reuse images across projects, and turn a shared collection into a gallery. Your original files stay where they are, with the same URLs.
The hard part is often finding an image you already have. A colleague uploaded it, the filename means little to you, and the library has grown since then. Categorize Media lets you look under the client, product, or campaign instead. When that image belongs in another project, add it there without creating a second copy to maintain.
Start with your everyday workflow: explore the WP PowerSuite demo and try finding an asset through folders. Already know what your team needs? Compare plans for your site.
Overview: organize media around the way you work
Categorize Media is a commercial media management module within WP PowerSuite. Organize your WordPress media while keeping existing attachments and URLs.
- Find assets by project: nested folders, search, colors, sorting, and breadcrumbs.
- Handle repeat work: bulk assignments, bulk folder creation, and duplication.
- File incoming assets immediately: choose a destination before adding files.
- Give your team useful views: shared, private, or selected role visibility.
- Publish a collection: a folder gallery with optional masonry and lightbox.
- Bring existing work along: supported imports and linked media translations.
At a glance: These are virtual folders. They group attachments without moving server files. Visibility controls organization, not file URL access.
How do you create and organize WordPress media library folders?
To create WordPress media folders, install and license WP PowerSuite Pro alongside Lite, enable Categorize Media, open the WordPress Media Library, create a folder, and assign existing attachments to it. Choose a parent when you want a subfolder. The searchable folder tree then becomes a familiar route to the files you use, in both the WordPress library and compatible media pickers. You can organize existing attachments without changing their public URLs. The module setup guide covers activation.
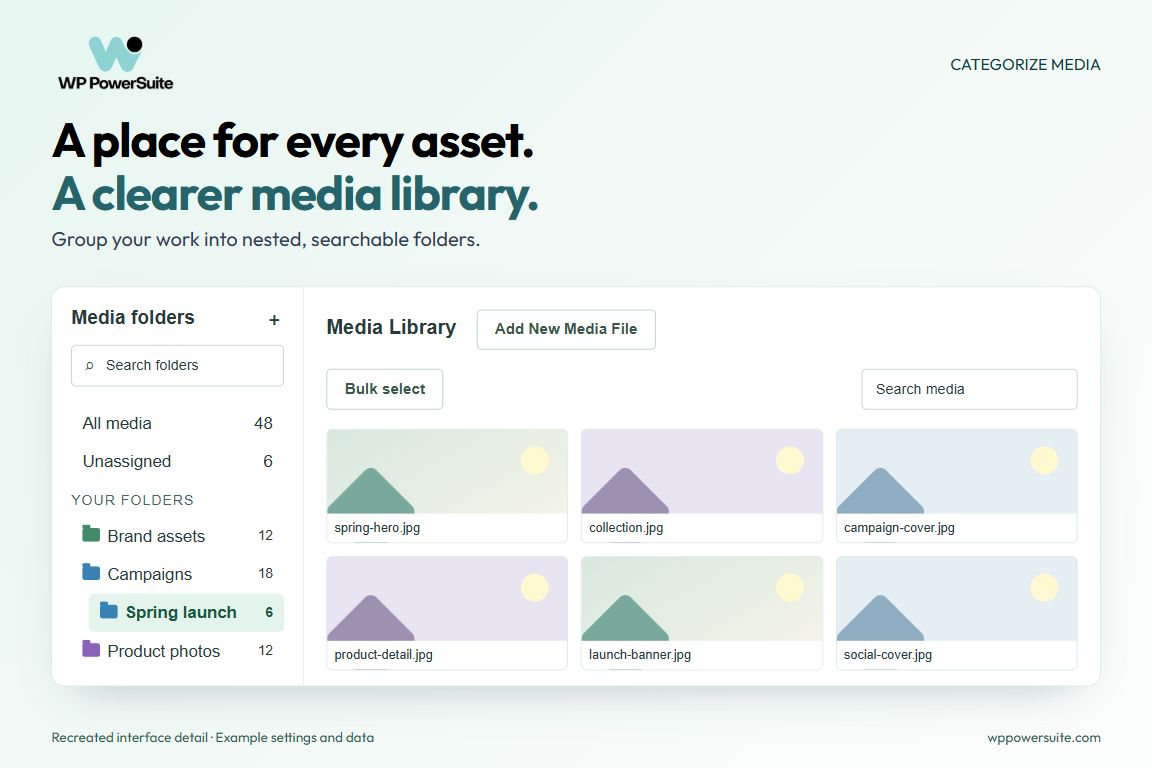
How do you create a folder and start filing media?
Create your first collection in WP PowerSuite with these 5 steps, then check it in the WordPress media picker.
- Name the collection. Choose New folder and enter a name your team will recognize, such as Brand assets or Spring launch.
- Choose its place. Use Top level for a main collection, or choose an existing parent for a nested folder.
- Set its color and visibility. Keep the name meaningful so color is a helpful cue, not the only way to identify it.
- Select a few attachments. Open Organize selected media and choose the appropriate assignment action.
- Find them again. Select the folder, then open your normal editing screen and try the same collection in the media picker.
Start with one folder for the images and files you use every week. Rename it or change its parent as work changes.
What does a useful folder structure look like?
A useful WP PowerSuite folder structure starts with project names people recognize, then uses subfolders for the types of assets they need. For a campaign, that might be Campaigns > Summer launch, with 3 subfolders: Photography, Social assets, and Documents. Keep reusable logos in a shared Brand assets collection. WP PowerSuite’s Add action lets that same attachment appear in both places. This gives the team a project view without making every reusable file belong to just one project.
Agree on that first level before creating lots of subfolders. Add another level only when it makes the choice clearer. If people regularly debate whether an image belongs under Products or Campaigns, use both memberships rather than uploading it twice.
Which optional features should you enable?
Enable the tools your team uses: media picker support for editing, upload organization for incoming work, and galleries for public collections. Categorize Media has 12 feature switches, including 4 enabled by default. Open Folder settings and follow the advanced settings shortcut to choose the tools you need. Gallery, masonry, lightbox, imports, translations, bulk folder creation, duplication, and dynamic views have individual switches. Enable a tool before using its workflow below. For the base plugin and Pro add-on, follow the installation guide.
A fresh configuration enables media picker integration, sorting, breadcrumbs, and drag and drop. Saved choices are respected. Turning a feature off keeps existing folders and assignments. Turning galleries off hides their rendered output while leaving the blocks and shortcodes in your content.
Add, move, or remove existing media in bulk
To organize existing media in bulk, select files in WordPress, open WP PowerSuite’s Organize selected media dialog, and choose Add, Move, or Remove. These 3 actions let you reuse attachments, refile them, or remove selected memberships. You can apply the same choice to multiple files, such as a product’s photography and size guide, in one operation. Each changes folder membership; none creates a second attachment or moves the original file on disk.
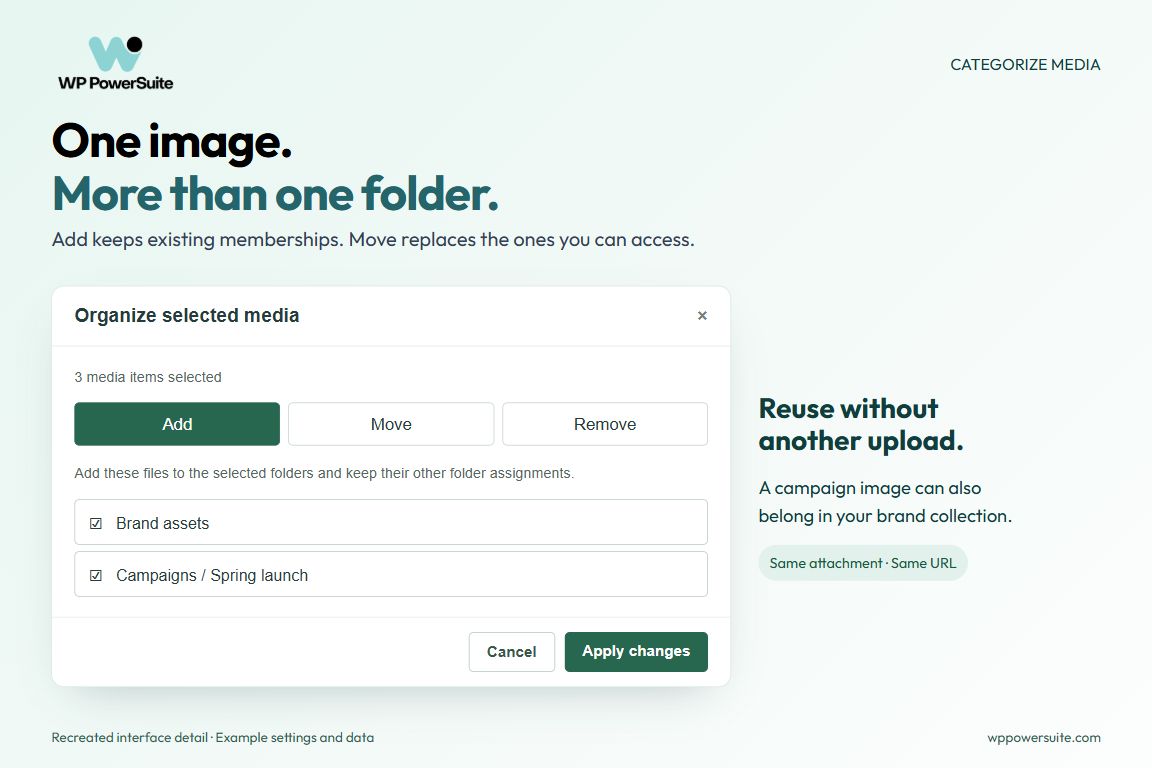
Should you add, move, or remove a media assignment?
In WP PowerSuite, choose Add for reuse, Move for refiling, and Remove to take a file out of selected collections. These 3 actions preserve the underlying WordPress attachment.
Add
Keeps existing memberships and adds the selected destinations.
Reuse a product photo in a launch campaign.
Move
Replaces memberships you can access with the selected destinations. Inaccessible memberships are preserved.
File reviewed assets into their working collection.
Remove
Removes the selected memberships while keeping the attachment.
Take an image out of an ended promotion.
For example, keep a product image in Product photos and add it to Spring launch. Both entries point to one attachment. When the campaign ends, remove that campaign membership. The original stays available for the product page and future work.
How do drag and drop and batch progress work?
WP PowerSuite supports drag and drop to organize media and rearrange the folder tree. For a large selection, use the assignment dialog to check the action and destinations first. The 3 assignment actions, Add, Move, and Remove, run in batches and report updates, skips, and errors. The assignment dialog’s Stop after this batch
button pauses after the current batch finishes. Review those results before retrying a selection so you can distinguish completed changes from items that still need attention.
Create up to 100 folders in one operation
WP PowerSuite’s bulk creation tool creates up to 100 sibling folders from a list of names. Enter one name per line and choose who can use the group. For example, enter Photography, Social assets, and Documents on separate lines to create three siblings under the current parent. Choose Only me for a private working set or the available shared choice when the team needs access.
“Each line is a name, not a folder path.”
WP PowerSuite, Bulk create folders dialog
How do you duplicate folders without duplicating uploads?
WP PowerSuite’s Duplicate action copies a folder structure and links existing attachments without duplicating uploads. Give the copy a new name, choose whether to include subfolders, and decide whether it should also reuse the media assignments.
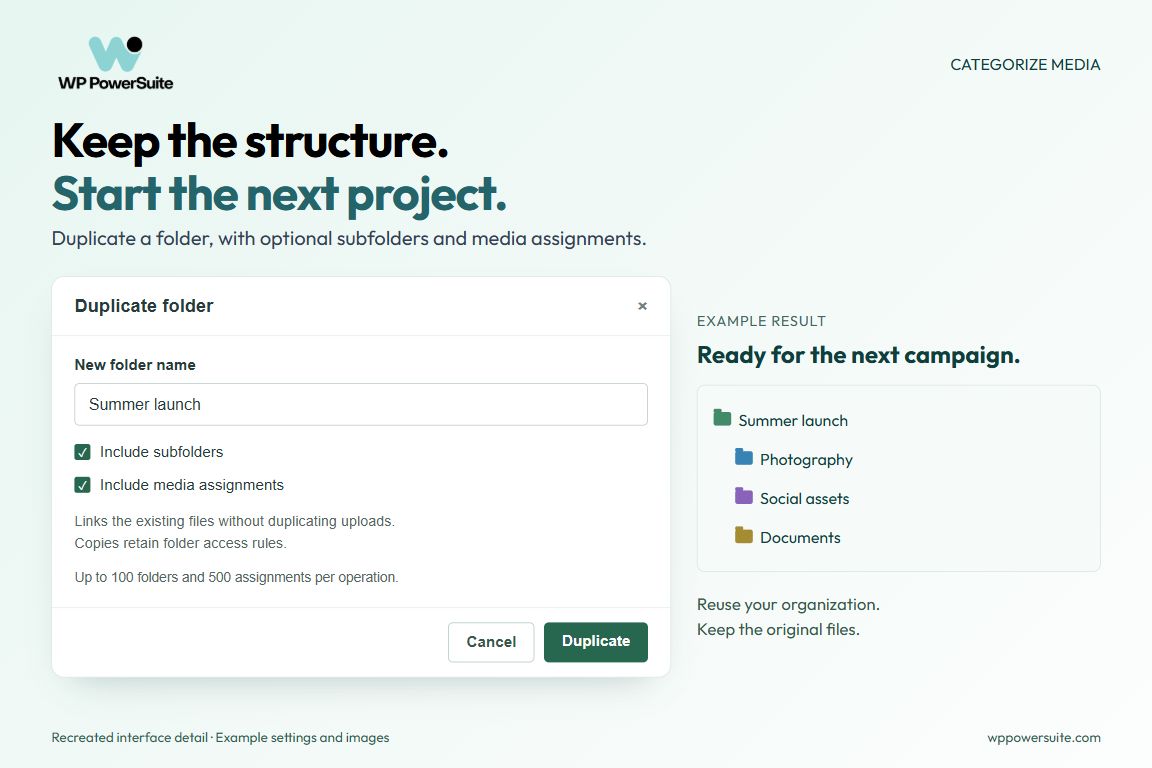
Copy the structure alone when the next client project needs empty working folders. Include assignments when another campaign will reuse the same brand assets. The copies sit beside the original and retain its access rules. Review visibility before involving a different team.
Operation limits: Duplicate supports up to 100 folders and 500 assignments at a time. Choose a smaller branch or copy only its structure for larger collections.
“Links the existing files without duplicating uploads.”
WP PowerSuite, Duplicate folder dialog
Search, sort, and filter your media folders
In WP PowerSuite, select a specific folder to filter its media, including accessible descendants in the library view. Search folders finds a branch by name; WordPress’s media search finds an attachment within the current selection. You can browse thumbnails in WordPress’s grid or list view, with folder information and filtering provided by the module.
WP PowerSuite offers 5 folder sort choices: manual, name ascending, name descending, newest, and oldest. Your choice is remembered. Switch to manual order before using Move up or Move down to arrange sibling folders yourself.
Breadcrumbs show the route from All media to your current collection. Click a parent to return to that level, collapse branches you are not using, or adjust and hide the sidebar to make room for your work.
Find a PDF, recent upload, or colleague’s files
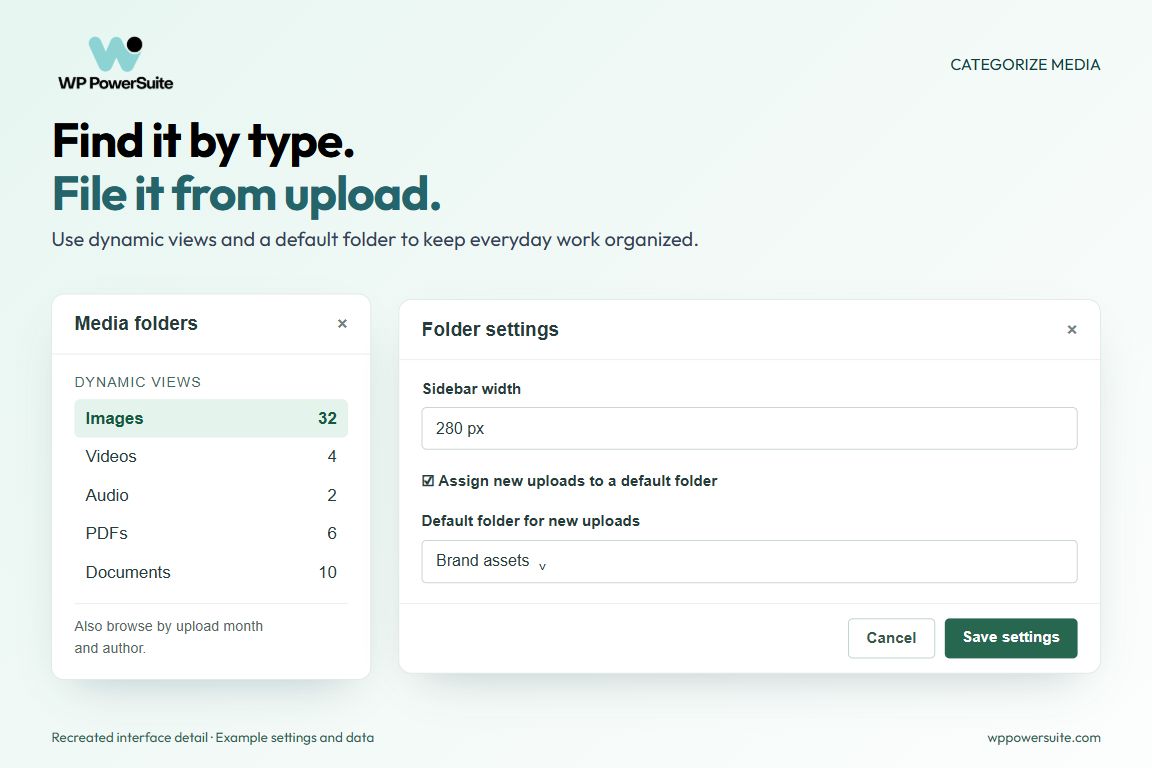
WP PowerSuite’s dynamic views provide five file type groups: Images, Videos, Audio, PDFs, and Documents. Enable the feature to browse these groups, or find attachments by month and author. These views use existing attachment information. They help when you remember the file type or who uploaded it but not the project name.
Folders describe your business context. Filters describe the files themselves. You can use both without maintaining another set of tags. The original image caption, alt text, and video details remain part of the WordPress attachment details.
Upload files directly to the desired folder
In WP PowerSuite, choose a destination in Upload to folder before adding new files. The searchable selector appears in 3 upload contexts: the library’s inline uploader, Media > Add New, and the Upload Files tab of standard WordPress media dialogs. Select an accessible folder, the default destination, or Unassigned. Check that choice before adding the batch so the queue captures the destination you intended.
What happens when you change the upload destination?
Changing WP PowerSuite’s upload destination affects newly queued files only; files already queued in WordPress keep their captured target. The initial destination follows the selected library folder. After you choose a destination, browsing another collection does not change that choice.
That means you can queue campaign photography, switch the upload destination, and then add product images without mixing the two batches. Check the selector before uploading a new group rather than relying on whichever folder you happen to browse next.
How do the default folder and Unassigned work?
WP PowerSuite uses your explicit upload choice before a default folder. Choose Unassigned when a batch should stay outside the filing structure. These 4 rules apply to the destination captured for each queued file:
- A selected destination wins: the uploader uses the captured folder choice.
- Unassigned is deliberate: choosing it explicitly suppresses the default assignment.
- A default provides an inbox: set Incoming assets if new work needs review before filing.
- An unavailable destination gets a notice: uploads can complete with an accessible default fallback when available.
WP PowerSuite reports an unavailable destination with this notice:
“Your file was uploaded, but the selected folder was unavailable. The default folder setting was used.”
WP PowerSuite, upload destination notice
Create an image gallery from a media folder in Gutenberg
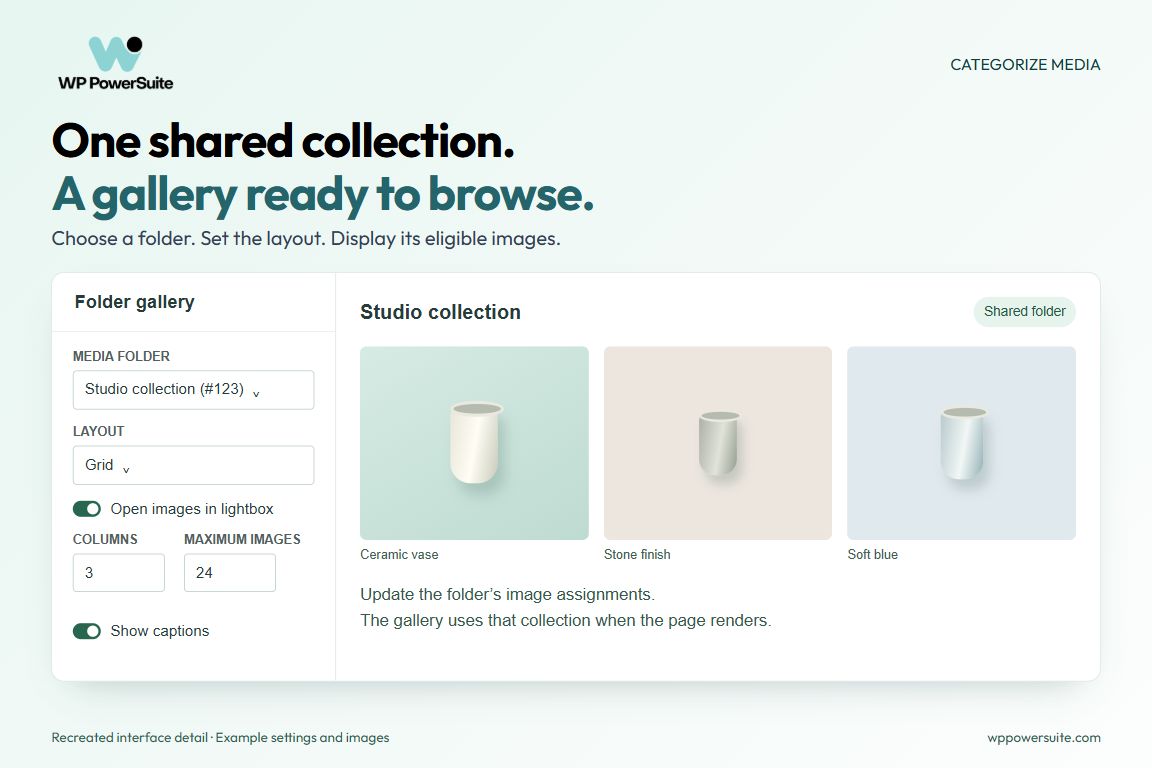
WP PowerSuite’s Folder Gallery block creates a public image gallery from one shared folder. Enable galleries, then insert the block in the Gutenberg editor for a post or page. Choose a shared folder and set its layout. The gallery displays eligible images assigned directly to that collection, so you can manage the image selection within the media library. Preview the page before publication to check that the chosen collection contains the images you intend to show.
Which gallery layout and display options can you choose?
WP PowerSuite offers grid or optional masonry layouts, image sizing, sorting, captions, media links, and optional lightbox viewing. Set 1 to 6 columns and up to 200 images for each gallery.
- Layout: use a regular grid or enable masonry for natural image heights in columns that read from top to bottom.
- Size: choose one to six columns and a limit of up to 200 images. The initial settings are three columns and 24 images.
- Order: sort by upload date, title, or media order, then choose ascending or descending.
- Presentation: choose the image size, show existing captions, and optionally link to the media file.
- Lightbox: enable the feature and turn it on for the gallery to open images and browse the collection.
Can you insert the gallery with a shortcode?
Yes. WP PowerSuite supports the wppsmodule_folder_gallery shortcode as well as its Gutenberg block. Use [wppsmodule_folder_gallery folder="123" columns="3" limit="24" layout="grid" captions="1"]. Replace 123 with your shared folder’s actual ID. Paste the code into a WordPress Shortcode block when using the block editor. The shortcode and Gutenberg block use the same renderer and eligibility rules. Change the columns or image limit to suit the page. A shortcode does not bypass the shared folder requirement or include images from subfolders. Preview the saved page to check the resulting image selection. You can use the same collection in posts and pages without maintaining a separate selection for each.
Which images can appear in a public folder gallery?
WP PowerSuite’s Folder Gallery shows eligible images assigned directly to one shared folder. The chosen folder and its ancestors must be shared; private or role restricted branches are excluded. Images in subfolders are not included. Password protected attachments and attachments with nonpublic or password protected parent content are also excluded. Review direct assignments and parent visibility before publishing.
“Only shared folders are eligible. Private or restricted ancestors prevent public display.”
WP PowerSuite, Folder Gallery block help
How do you update a published folder gallery?
Add or remove image assignments in WP PowerSuite to update Folder Gallery on its next page render. If your website serves a cached page, refresh the relevant cache to show those changes. Making a folder shared does not publish it automatically: place a block or shortcode wherever you want visitors to see it.
Before publishing: review the collection as a visitor. The library can show images from accessible subfolders, while a gallery uses direct assignments only. If the gallery selection looks different, check those assignments first. Keep working images outside the collection you intend to display.
Put the workflow to work: use a shared portfolio or campaign collection as your first gallery. Choose a WP PowerSuite plan for your site when you are ready to bring folder organization and galleries into your process.
Choose who can use each folder
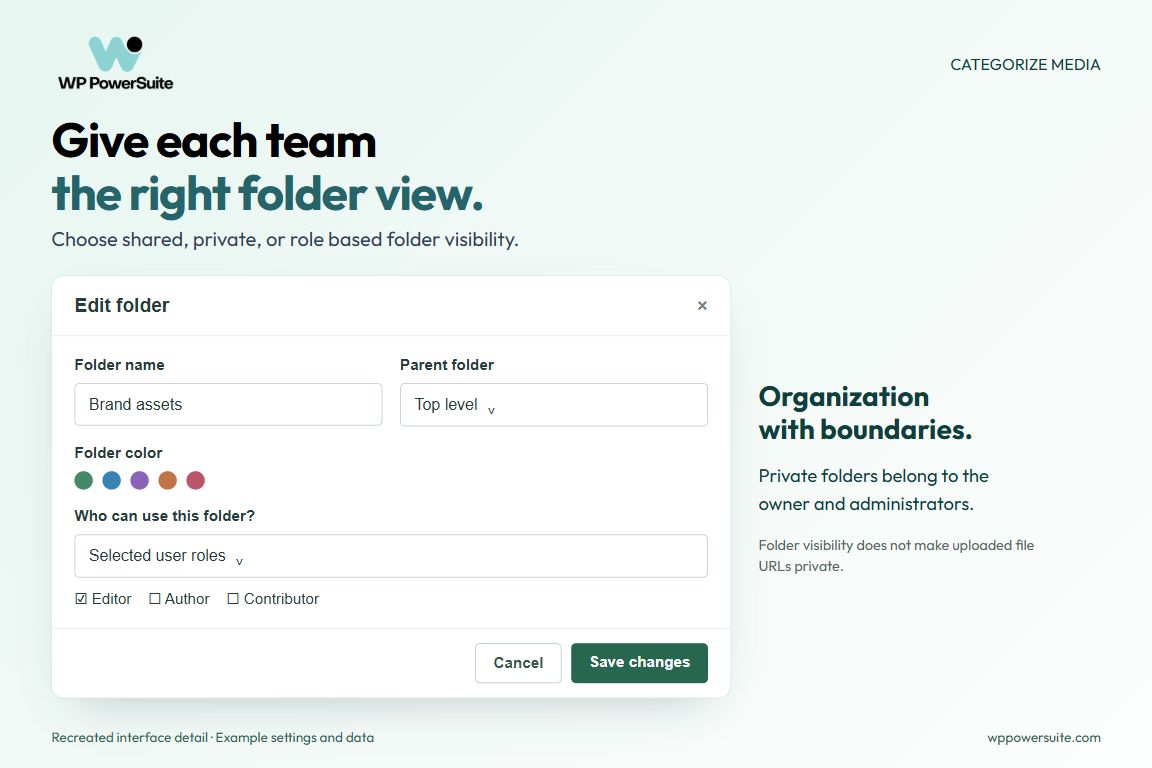
WP PowerSuite’s Categorize Media supports three visibility choices: shared, private, and selected roles. Shared folders are available to people with media access. Private folders are available to their owner and administrators. Selected role visibility lets you give the relevant team access to a collection. Choose visibility when creating or editing the folder, then check that its parent branch allows the intended team to reach it.
What do folder permissions protect?
Folder permissions in WP PowerSuite control access to internal organization, not public file URLs. A private collection is a personal work area, not confidential storage. People without broader management rights can manage their own private folders. Parent visibility also affects access, and sensitive branch changes require administrator confirmation.
These controls work alongside WordPress roles and capabilities. If the document itself must be confidential, use a download protection solution: someone with a public upload URL may still retrieve it.
Apply assignments to linked media translations
With translation support enabled and WPML or Polylang available, choose Also update translated media in the assignment dialog. The action can include attachment translations already linked by that plugin. For WPML setup, its Media Translation guide explains how translated media is managed. This saves you from finding and filing each linked record separately.
You need editing access to the affected translations. If one cannot be edited, resolve that access or turn the option off for the operation and organize the original alone. The functionality applies folder assignments; it does not translate text, rewrite captions, or create missing translations.
Import from the WP Media Folder plugin and other supported sources
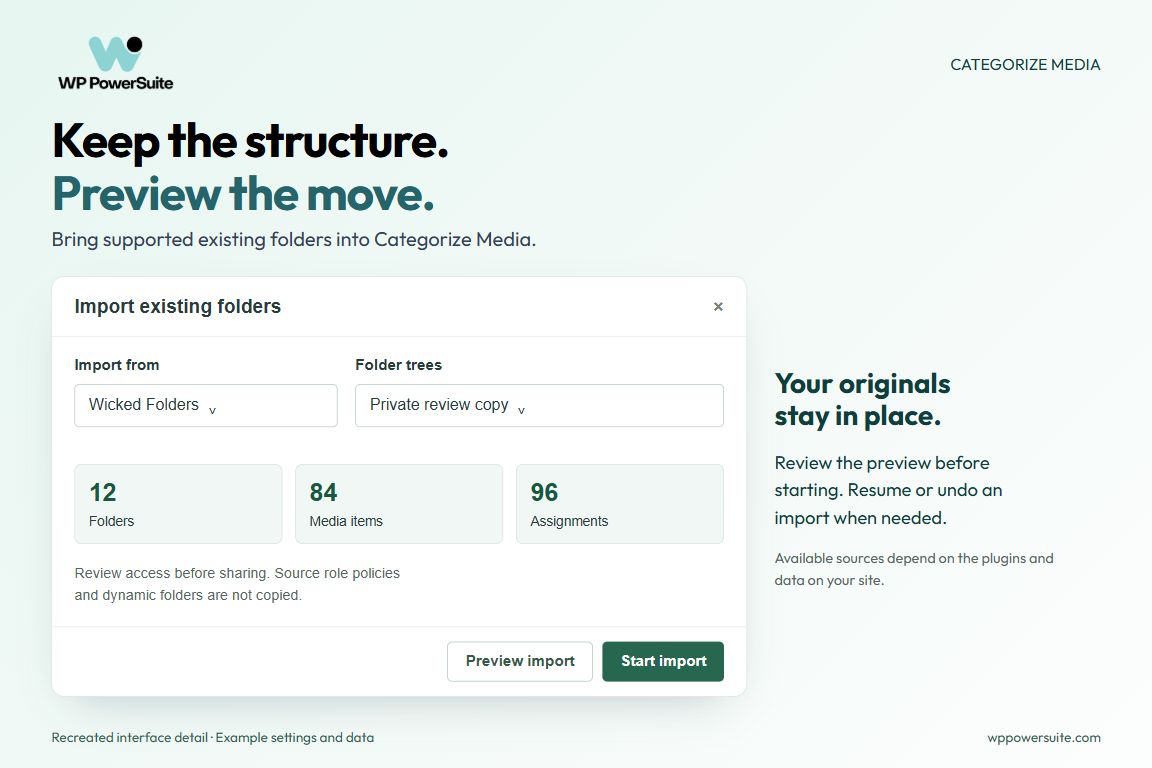
To import from WP Media Folder or another supported source, enable WP PowerSuite’s migration tools and open Import existing folders. Select the detected source, choose an available scope, and preview the folder and assignment counts before starting. The original files and organization stay in place. There are 11 supported sources, but the importer checks the data format rather than assuming every plugin version is compatible.
Which 11 media folder plugins can you import from?
WP PowerSuite supports imports from FileBird, Wicked Folders, HappyFiles, Enhanced Media Library, WP Media Folder, Folders by Premio, WP Media Folders, Media Library Assistant, Mediamatic, Real Media Library, and Media Library Folders. Availability depends on the installed plugin and its supported data format. If your source is not detected, check those requirements before planning the migration. A source name in this list does not mean its galleries, cloud storage, or permissions will be reproduced. The scope preview tells you which organization can be brought across.
What does a folder import keep or leave behind?
WP PowerSuite imports supported folder organization and existing attachment assignments. FileBird has verified import scopes; the other 10 sources use private review copies. Check the scope before treating the result as ready for your team.
- FileBird: version and storage checks determine the available scopes, which can include shared and personal trees, your own tree, or a private review copy.
- The other ten sources: supported folder names, hierarchy, and existing attachment assignments are copied into private folders owned by you.
- What stays behind: source permissions, colors, custom ordering, gallery configurations, cloud only files, and dynamic folder behavior are not transferred by those private review imports.
Review the imported structure before sharing it; rebuild public galleries separately.
Batch processing, resume, and Undo this import make the transition reviewable. Keep a recoverable backup of your database and uploads, test a representative collection, then check its access settings before extending the move.
Can media folders work with WooCommerce and a page builder?
Yes. Categorize Media integrates with standard WordPress media pickers used by compatible WooCommerce, editor, and custom field workflows. Enable media picker support, open the image selection dialog you normally use, and choose the relevant collection there.
A page builder that replaces the native media interface may behave differently. Check the actual product, post, or page editing screen your team relies on. For a shop, try finding a product image and a size guide; for publishing, try inserting a campaign image into a draft.
Try the media organization workflow in the demo and see whether its folders match the way you find and reuse assets.
Which WordPress media folder plugins are best, and what features do they offer?
The best WordPress media folder plugin depends on the features your team needs. Choose WP PowerSuite for reusable assignments, team visibility, upload destinations, and folder galleries within a modular WordPress plugin. Compare alternatives when ZIP downloads or cloud connectors are essential.
For comparison, FileBird offers drag and drop folders and a gallery block; its Pro version includes downloading folders as ZIP files. WP Media Folder offers folder organization and galleries, with cloud connectors available through its add-on. Check the relevant package when those capabilities are essential. For managing media within WordPress, Categorize Media brings the workflow covered here into WP PowerSuite.
What does WP PowerSuite’s media library plugin help you do?
WP PowerSuite covers 4 everyday tasks: organizing, finding, reusing, and displaying WordPress media. Use its media manager when those are the jobs your team needs to do. Categorize Media covers the workflows below.
Organize files and folders around projects
Nested collections, search, colors, sorting, and breadcrumbs.
Reuse one attachment in several projects
Multiple memberships without duplicate attachments.
Prepare recurring client work
Bulk creation and duplication with optional media assignments.
Display a selected collection
A gallery block or shortcode with optional masonry and lightbox.
Move physical folders on the server
Not provided; this is virtual organization, not a server file manager.
Evaluate physical server directories and protected downloads separately. You still choose useful alt text, captions, and image sizes for published content.
How do you fix common WordPress media folder problems?
To fix common WP PowerSuite media folder problems, enable a missing feature, clear an active search filter, or check folder permissions with an administrator. For uploads and Folder Gallery, verify the selected destination or shared collection before changing the structure. Use these 5 symptoms to choose the next check.
- A control is missing: enable its feature, reload the page, and confirm that the screen uses a supported standard picker.
- A collection is missing: clear the folder search, expand its parent, and check visibility with an administrator.
- Uploads went elsewhere: review Upload to folder, the default, and destination notices. Queued files retain their captured target.
- A gallery is empty: check gallery activation, shared ancestors, directly assigned eligible images, and page caching.
- An import stops: review its source and storage requirements before retrying; keep the original organization until the copy is verified.
Why is WordPress unable to create a directory?
WordPress may be unable to create a directory when its upload path is incorrect or the server account cannot write to that location. This concerns filesystem access, not a virtual folder assignment. Ask your hosting administrator to inspect the location and the account’s permissions. Adding another media folder will not repair a filesystem problem. The WordPress file permissions guide explains how ownership and permissions affect access. Have your hosting team check the cause before changing permissions; avoid making the entire storage location writable to everyone.
What should you know before organizing WordPress media folders?
WP PowerSuite adds virtual media folders, reusable assignments, upload destinations, and optional galleries to the WordPress Media Library. Your original file URLs stay unchanged. Private folder visibility does not protect public downloads, and deleting a folder does not delete its files. The answers below cover those distinctions before you change an existing library.
What is the media library in WordPress?
The WordPress Media Library is the dashboard area where you upload, find, and manage images, video, audio, and documents. Open Media to browse the files already on your site. Attachment records and metadata live in the database; files normally live in wp-content/uploads. WP PowerSuite adds a folder view to this existing collection, so there is no need to start a second library. The WordPress Media Library documentation describes the underlying screen and its normal grid and list controls.
Does WordPress provide media folders by default?
No. The default WordPress media library includes search and date and type filters, but not this module’s nested project folders. Categorize Media extends that default media screen rather than replacing your existing attachments. WordPress may store attachments in year and month locations on disk; that is different from a project structure in the dashboard. WP PowerSuite adds folders and subfolders that you name and manage yourself. Its folder taxonomy groups attachments separately from your blog categories, so organizing a campaign’s images does not recategorize its posts.
Can one file belong to multiple folders, or use real server folders?
WP PowerSuite lets one WordPress attachment belong to multiple virtual folders through its Add action. Choose Add to keep current memberships while including it elsewhere. These are not real folders on disk, and the module does not relocate attachments on your server. The media file keeps its URL, so existing image links continue to refer to the same attachment. For example, a product photograph can appear in both Products and Spring launch while its published product page continues using the original image.
Can you create unlimited folders?
Categorize Media has no fixed total folder quota. Its limits apply to individual operations: bulk creation accepts 1 to 100 names, and duplication handles up to 100 folders and 500 media assignments at a time. Those are batch limits, not a total library allowance. Your hosting resources still affect practical capacity. Start with collections your team needs, then expand the structure as projects grow. For a large branch, work in smaller groups rather than expecting one operation to process everything.
Does deleting a folder delete its files?
No. WP PowerSuite’s Delete folder action removes the organizational group, not the WordPress attachments. If the folder has children, you can keep them and move them up a level or remove the branch. Unassigned is a filing view, not a list of unused images: it does not prove that a file is safe to delete from the site. An image without a folder assignment can still be used in a published page. Review actual usage before removing the attachment itself.
Are private folders secure storage for confidential documents?
No. WP PowerSuite’s private folders control organizational access for the owner and administrators inside WordPress. They do not protect a public file URL. Use them for personal filing and work areas, and use an appropriate download protection system when visitors must be authorized to retrieve the underlying document. The gallery also has its own eligibility rules for public display: its collection and ancestors must be shared, and only eligible images assigned directly to that collection appear.
Does duplicating a folder create duplicate uploads?
No. WP PowerSuite’s Duplicate action copies folder organization and optionally links existing WordPress attachments. Choose a structure only copy for an empty project template, or include assignments for another campaign that needs the same images. The operation supports up to 100 folders and 500 assignments. Copies sit beside the original and retain its access rules, so review visibility before handing a duplicated project to another team. Larger branches need smaller operations.
Does a folder gallery include subfolders?
No. WP PowerSuite’s Folder Gallery displays eligible images assigned directly to the chosen shared folder. Its ancestors must also be shared. Add the images you want to that collection, then use the Folder Gallery block or shortcode. Keeping the selection explicit makes it easier to review what visitors will see before publishing a post or page. The library view can include accessible descendants, so its visible selection may be broader than the gallery’s. Check direct memberships when an expected image is missing.
Can I choose a different folder for each upload batch?
Yes. WP PowerSuite’s Upload to folder selector lets you choose a destination for each new batch of WordPress attachments. Files already in the queue keep their original destination, while newly queued files use the new choice. Select Unassigned explicitly when you want to bypass the default assignment. This lets you upload images for different projects without manually refiling every batch afterward. Browsing a different collection does not override a destination you explicitly selected; check the selector before adding the next group.
Can I switch from another media folder plugin?
Yes. WP PowerSuite can import supported data from 11 media organization plugins. Preview the detected source and scope before starting. FileBird has version and storage checks; the other supported sources use private review copies. The importer keeps original media and organization in place and supports resume and undo. Review the result and access settings before sharing the new structure. Private review imports preserve supported names, hierarchy, and existing attachment assignments, but leave source galleries, cloud only files, permissions, colors, and custom ordering behind.
Conclusion: make your existing media easier to use
WP PowerSuite’s Categorize Media module lets you organize media with folders your team can recognize. Memberships let people reuse existing assets, and chosen destinations keep new work organized. When a collection is ready for visitors, the gallery feature connects that same filing workflow to your content.
Try one complete task before reorganizing the whole library: create a project folder, add an existing image, find it from an editing screen, and choose a destination for the next upload. That will tell you more about the fit than building a large empty folder tree.
Try that workflow in the WP PowerSuite demo. If it matches how your team works, choose a plan and start with your next project.